Studio Shoot Final Images

I’d been so focused recently on other aspects of the course, I realised it was time for an analysis of my studio photography images & final prints.

The Studio Photography project brief was to present two images as an advert of a product using two different approaches. The first was to be a still life set up, the second to include a person (or part of).

The first image here is the still life set up. Featuring my selected item of a shoe, it also includes various items of jewellery. Shot using the 50mm lens it was edited in Camera Raw, where I upped the contrast & adding a vignette. I chose to have this printed on a titanium finish paper. The metallic tone nicely compliments both shoe & sparkles. With regards to the composition, I like the way the blue jewel looks like a snake eye. The bokeh created by using the 50mm lens leads the eye to the main subject instead of distracting from it.

_DSC0122_1100

The second image took a bit more work. I first edited the image in Camera Raw to get the right black & white tone. It then needed a further edit in Photoshop using the healing brush tool to smooth out the skin. Have to remember that adverts are selling a dream & a sock mark on an ankle doesn’t quite fit into that remit!

With regards to composition, the words which again resonates is sensuality & glamour. This harks back to my research on historical & contemporary studio photographers. There’s a strong resonance of that particular Hollywood style I really like.

With regards to the final print, the paper I chose was Ultra Pearl Finish. This gives a nice pearlised finish which suits the black & white aspect.

_DSC0171_1100_Edited

Looking back at my studio experience, the main thing I’ve learnt is preparation is key. The more you plan & prepare, the better the outcome. Also, if things don’t quite go to plan, don’t panic & make the most of what you’ve got. Sometimes the results will be a lot better than you think!

Criteria ref: 1.2, 3.3, 4.1, 4.2

Taking a Closer Look

A couple of months ago, after using my DSLR Nikon D5500 camera for about a year,  I decided to take a step up. A new lens.

The camera initially came with an 18mm to 55mm zoom lens. This covers a wide range of focal lengths & purposes. However, this does have its limitations. But what lens is best?

When looking at the lens section of any photographic equipment website, there are a plethora of different sized-lenses starting at £90 & going up to the heady heights of £1,300 (ouch!). Zig also advised taking a look at the focal lengths you most go for. I have to admit I much preferred using the 55mm setting then moving in close to my subject.

The lens I was veering to was a 50mm, which costs around £150 (depending on which site you visit). This is ideal for portraits & getting a bit closer to the subject. Plus, it won’t totally break the bank.

The decision to take the plunge was made during the shoot when I produced the final images for the Studio Photography assignment. That was when I borrowed a classmate’s Nikon AF-S Nikkor 50mm f/1.8G Lens.

50mmLens

This 50mm lens is what’s known as a prime lens – it has only one focal length. This means you can’t zoom. To frame a shot or capture what you want, you have to get physically closer (or further away) from your subject. The perspective doesn’t change. This aspect has taken a bit of getting used to, but I’ve been persevering with the 50mm over the last couple of months with some great results. It does take a while to get intimately acquainted with the physical characteristics of your lens. Practice really does make perfect.

The other aspect of using the 50mm lens which I found frustrating is its minimum focal length – in this case, 45cm. If you really want to get closer to your subject, you have to splash the cash on a different macro lens. Or do you…

With my recent shots in Bushy Park focusing on the bark, I was getting annoyed with not being able to get close enough to frame the images I wanted to create. Then, Zig introduced us to the magical world of macro photography. This was a whole new area of photography that I hadn’t yet considered. I’m not going to go into major detail of this specialist section, but there was one accessory Zig highlighted which could help me with this particular project: extension rings.

ExtensionRings

These enable you to get closer to the subject by extending the length of the light travelling through the lens. They also cost around £25, so not stupidly expensive. However, are a few considerations. You have to use the manual focus setting otherwise the focal distance limitation is still in action. Also, as it takes longer for the light to travel to the sensor, it extends the exposure time. Ideally, it’s best to use a tripod to avoid camera shake.

After using the 12mm ring for one session, I realised that I was getting a bit too close to the subject to get the same results as my 50mm lens. I was also losing my spontaneity when capturing shots, which I found frustrating. It’s certainly something I’ll be using in the future, but for my current project, I’ll stick to my nifty 50mm.

Criteria ref: 2.1, 2.4


Camera Reversa

I recently had the opportunity to take part in a make-over/photoshoot experience. This was ideal to see the set up for one of these ventures. Thought it would be interesting to see what kind of studio they had, camera/equipment used plus how the photographer dealt with the subject.

There were two further objectives. First, to put myself in the position of subject. By being on the other side of the camera makes you appreciate what that individual is going through & how you can deal with those issues. The second was getting a few shots which I can use on social media & professionally.

I have to admit that I’ve taken part in a couple of professional shoots before, so had an idea of what to expect.

The first ever photo shoot I did was for a Japanese hairdressing magazine. This was back in 1987 (eek!). I really can’t remember too much about it, but it was great fun. This was also a time before mobile phones, selfies & digital cameras. After being dressed & coiffed & made up for the shoot, I ventured into the studio. What did stick in my mind is the heat & brightness of the lights.

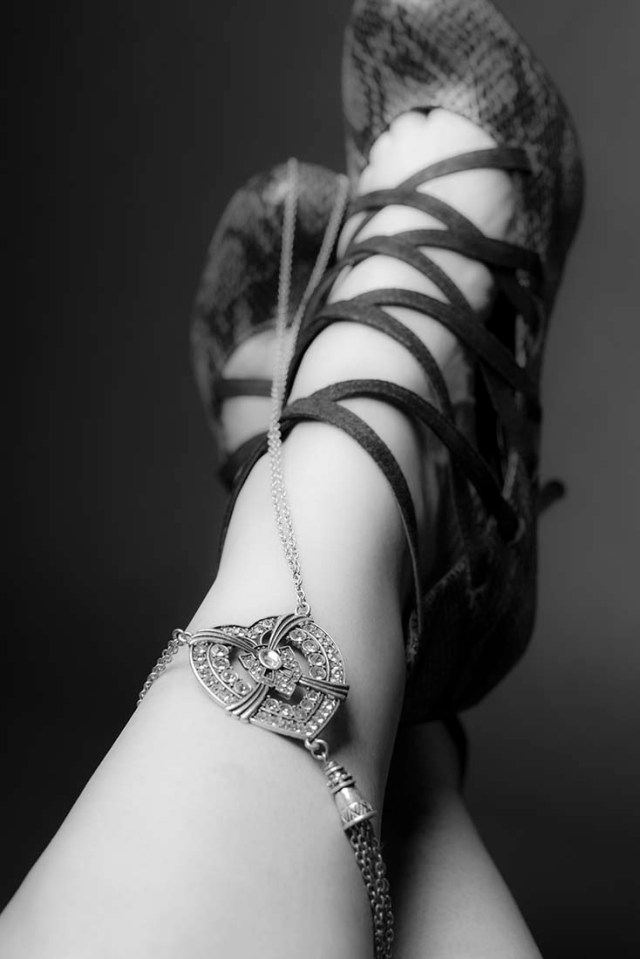
Another thing I recall was the test shots. As there wasn’t a way to see pictures taken by the film camera, a few polaroids were taken. The photographer gave them to me as a momento, which I’ve kept to this day. I also still have the original magazine pages (which are the first of the following images which I scanned). The last three images are the polaroid scans. It’s interesting comparing the ‘official’ ones & the test shots. No idea how they did it using colour film, but it brings home how easy it is today to manipulate images.

My second studio experience was in 2002. I took part in a makeover article for a women’s magazine. Unfortunately, my story & images didn’t get printed, but I did get these three photos:

So, this is what happened during my third ‘official’ photo shoot.

Turning up the appointed time with a couple of suitable outfits stuffed in my back pack, I was ushered into hair & make up. After a discussion with the stylist, I agreed for a professional look, rather than total glamour puss. The make up was much heavier that I’m used to, plus I had false eyelashes put on which were quite itchy. My hair was dry-styled with hair curlers. Normally, I have straight hair, so it was nice to have something subtly different from that I’m used to. Looking in the mirror, the person staring back at me was more of a ‘hyperreal’ version of what I’m used to. Not offensive or too shocking, just different from what I’m used to.

Next I met Hanna, the photographer, who escorted me to the studio area. I first went into the changing room & put on my first outfit. The studio itself had a range of backgrounds about one to two metres across. Hannah informed me we had about 30 minutes to take photos. Then we were off.

Hannah was friendly & quite helpful. She directed me with regards to poses, asking me to tilt head this way, change foot position, look into the camera. Firm, but confident in what she was doing. You could tell that Hannah was more used to people who hadn’t done something like this before.

It was interesting to note that the lighting in the studio itself was quite bright, with only a soft box for contrast. From what I learnt during the previous studio sessions during the course, I knew that it would be a flattering light, but not very dynamic.

After the photo session, I then had to choose five images. It was easy getting down to about ten, but then I remembered what the objective was. I soon whittled it down to the required five.

About a week later, I received a CD rom with the images. Interestingly they weren’t edited so I had to do this myself using both Camera Raw & Photoshop.

Zig has pointed in previous sessions hat when taking photos of people, skin tone can appear more orange than in reality. Reducing both hue & saturation in Camera Raw gives a more natural appearance.

Another aspect that Zig brought to our attention was the less ‘imperfections’ during a shoot, the less time spent in front of a PC after. This was hit home to me when I had to edit the sock marks from my ankle on the final Studio Photography images. This point also resonated when I took a closer look at my images. No major changes, but taking out a small spot of smudged lipstick & zapping a bike bruise from my leg using the Healing Tool in Photoshop made a difference. Then using the blur filter made for a more flattering finish. The other changes I made to the shots was to crop either for a head shot or improve the composition, then resize the file for online usage

The other thing I don’t particularly like with the images is the ‘flatness’. Not enough contrast with regards to the lighting. I would certainly use more than one source in future to make the most of the subject.

I have to admit that this time last year I would have no idea what to do with the images I received. I probably would have either had put the images up online as they were or stuck the disc in a drawer, never to be looked at again. I’ve come along way…

Criteria ref: 2.1, 2.2, 2.3, 2.4, 3.2, 4.1


Studio Photography Influences

Another aspect of the Level 2 course is to ‘describe the work of influential studio photographers both historical and contemporary.’

Having taken a look at the suggested list of photographers’ work to take a look, there were a few names that jumped out. These included Cecil Beaton, Norman Parkinson, Mario Testino, David Bailey & Annie Leibovitz. I’ve always been aware of their work, but not really taken a closer look. There were also a few I hadn’t heard of, including Richard Avedon, Peter Lindburgh, Angus McBean, Bruce Weber & Albert Watson.

While researching those on the list, I noticed my eyes always been drawn back to a certain type of image. I have to admit a penchant for glamorous black & white Hollywood-style shots. The lighting tends to be quite dramatic which produces halos, reflections, softening shadows & sharp contrasts. Despite my use of bright colours for my other recent images, I very much prefer monochrome.

Here is a selection of images that I really liked of studio photographers I admire.

Cecil Beaton

Norman Parkinson

Angus McBean

David Bailey

Mario Testino

Annie Leibovitz

It was during my fellow classmate’s presentation on Mario Testino that one word really resonated. Sensual. Another I could add to that is strong. None of the subjects in the photos I’ve selected are depicted as weak – all exude a certain unspoken confidence.

I can see this particular influence in my final images from the studio shoot (despite one being in colour!). I have to admit that this research was done after the studio shoot had taken place, but I’m sure going forward I’ll be exploring this further. Having converted many images to black & white I’m getting to know what works best. This is both in-camera & during editing.

If I can get close to recreating anything like those above, I’ll be a very happy photographer…

Criteria ref: 1.1, 1.2

Photo London 2016

Photo London is a major international photography fair bringing together 80 of the world’s leading galleries at Somerset House. This is a wonderful opportunity to see a wide range of images & types of photography. As such, it was high up on my list of exhibitions to visit this year.

Arriving at 3pm on the Thursday, I thought I’d potter round to see what delights were on display. A nice afternoon for some inspiration. However, what I wasn’t prepared for was the range of work on display & the quantity. Also, I thought it would just be contemporary works. Wrong! Prints from Fox Talbot, August Sander, Bill Brandt, John Cohen, Hasse Persson & Don McCullin. I finally surfaced about 7pm with my head spinning, thankful that I’d worn comfortable shoes!

I’m still mentally digesting & processing what I witnessed – both on the walls & within the gallery ‘environment’ itself. In the meantime, here is a selection of the photographers whose work really made an impact. The images include the ones on show & those I’ve since found while researching further my observations. Enjoy!

Sebastio Salgado

Yorgo Alexopoulos

Jim Campbell

Robert Currie

Yoshinori Mizutan

Bryan Graf

Dmitry Konradt

Ellie Davies

Karine Laval

Garry Fabian Miller

Chloe Sells

Luis Gonzalez Palma

Antony Cairns

Chema Madoz

Marcia Resnick

Last, but not least, I was exceedingly delighted to come across a photo of David Byrne (one of my musical/cultural heroes) which I’d not seen before. That one really did make my day!

DavidByrneMariaResnick

Criteria Ref: 1.1